Thursday 23 February 2012

Tips For Your Lipstick


Lipstick adds the final touch to any makeup application. Lining the lips creates subtle definition and perfects the shape of the lips


Things You'll Need


  • Mirrors

  • Facial Tissues

  • Lip Balm

  • Lip Brush

  • Lip Liners

  • Lipstick


  • 1
    Consider your lipstick color and finish. You'll do well with colors that match the natural shade of your lips, opting for darker tones that complement your overall coloring. Matte lipsticks offer a muted finish complementary to workday makeup, while satin and gloss finishes offer appealing evening looks.

  • 2
    Apply all other makeup before putting on lipstick and lip liner.

  • 3
    Begin by dabbing on a very small amount of lip balm or petroleum jelly to give your lips a little moisture.

  • 4
    Draw a thin line along the edge of your lips with a lip liner whose color is one shade darker than your lipstick. Start at the center of the upper lip and work outward. Hug the very outer edges to open up thin lips, and line well within the edges to downplay excessively full lips.

  • 5
    Apply lipstick from the tube or by using a firm, small lipstick brush. Coat the lips evenly. Pay special attention to staying within the lips' edges.


  • 6
    Blot to remove any excess color and to even out the texture.


    7

  • Remember to touch lips up after a meal, as lipstick easily transfers onto coffee cups, water bottles and soda cans.


  • Apply Your Blush...


    First, start with a good quality Blush Brush. You can accentuate your face and cheeks naturally. Smile and you will see the fleshy part that stands out the most; this is the apple of your checks. This is your starting point for applying your blush. Apply a light layer of blush to the apples of your cheeks and blend up and back toward your hair line.
     Things You'll Need:
    • Blush


    • Blush brush


    • Mirror

    Follow the step:


    Step 1

    • Select a blush that suits your purpose. Select a pink or peach shade of blush if you are using makeup to add color. Select a light shade of brown if you want to highlight your cheek bones.


    Step 2

    • Apply blush to your blush brush and tap off any excess.


    Step 3

    • Locate the top of your cheek bone with your finger. You will feel a bone about half way between the corner of your eye and the center of your ear.


    Step 4
    • Place the blush brush on the top of your cheek bone; pull the brush down and under your eye, following the curve of your cheek bone. This should be the shape of a comma lying down.


    Step 5

    • Disperse the blush from this line you just made down your cheek. Do not add more makeup for this step; just use the blush that has already been applied.


    Step 6

    • Repeat on the other cheek.


    Step 7

    • Even out your cheeks and add more makeup as desired using the technique above.


    Step 8

    • Brush a little color along your nose, your chin and your hairline using the remaining makeup on your brush. This creates a sun kissed look.


                                          ----------------------------------------------------


    Monday 20 February 2012

    Mascara Tricks


    One question I get a lot from people is what mascara I use. I have somewhat small eyes and refuse to leave the house without mascara because the moment mascara is applied my eyes suddenly appear to be of normal size.


    How to Properly Apply Mascara...

    Ace your mascara application with a 3-step process:
    1. Step 1: Wiggle the wand left to right at the base of lashes. It's the mascara placed near the roots -- not the tips -- that gives the illusion of length.
    2. Step 2: Pull the wand up and through lashes, wiggling as you go. The wiggling part is key because it separates lashes.
    3. Step 3: In this final step (which I always skip), close the eye and place the mascara wand on top of lashes at the base and pull through to remove any clumps.


    Get Your Smokey Eyes

    Smokey eyes have been a big style for quite awhile and there's no sign this particular trend is dying. Here we show you step-by-step instructions on how to get the perfect smokey eye.

    The key to the perfect smokey eye is proper blending. You want to make sure colors are blended together flawlessly. Also, it's important to pair light base colors with rich dark colors. Nice mixes include: Soft gold base with deep purple on top, champagne base with bright blue and peach base with green hue.


    What You Need....

    • Eye primer (you don't need it, but it's great for keeping shadow in place)
    • 2 Shadows: One light, one darker
    • Eyeliner
    • Makeup brushes
    • Mascara


    Just 7 steps...


    1. The key to keeping eyeshadow from melting into your eyelid crease as the day goes on is to kept eyelids oil-free. To do this start with an eyeshadow base (also called "primer"). Simply swipe the primer across the eye and let it dry before you continue to the next step.
      Some great primers for a smokey eye include MAC's 'paint' and Urban Decay's 'Primer Potion'.
    2. Apply eyelinerIf you're going for a typical black, brown or gray smoky eye, apply liner in one of those colors above the upper lash line, drawing line thicker in the middle of eye. If you're opting for a jewel-toned eye (violet makes a gorgeous smokey eye), line eyes with a purple, blue or deep green liner.

      For more intricate directions on lining for a smoky eye see How to apply eyeliner. Also see my list of the best eyeliners. I include several that work great for the smokey eye.
    3. Blend in color on bottom lashes For color on the bottom (a key smokey eye look) you'll want to use a eyeliner pencil because they're easiest to smudge. Once the line is drawn, run your finger over it to smudge the line. You can also apply a bit of shadow to get full smudge effect.
    4. Apply light base color Again, the key to a smokey eye is pairing a lighter base with the darker hue. I prefer a nice cream shade for my base. Sweep a light, shimmery shadow over the lids to your browbone. I love Stila's whipped eye shadows. The moist "mousse" consistency seems to stay on forever. My favorite colors are taupe and pearl.
    5. Blend in darker color, but keep dark color below the creaseNow that you have the base and eyeliner on, it's time to get the smokey effect. You need a darker eyeshadow shade. Using an eyeshadow brush blend in color starting at your lash line, blending up. Make sure to blend color into the lash line so the eye liner disappears. Stop deep color at crease. The key here is to blend, blend, blend.
    6. Doublecheck your work Make sure eyes match and blend color with a Q-tip if need be.
    7. Finish with several coats of mascara. You'll want to apply a few coats of mascara so lashes are thick and dark. If you don't have naturally long, curled lashes, curl them with a lash curler first. See my list of best mascaras if you don't have one you love.


    Thursday 9 February 2012

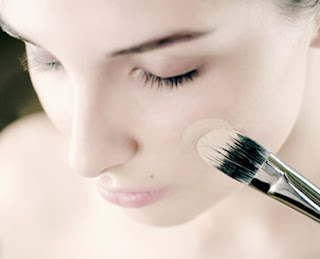
    How to Apply Foundation..

    JUST 8 STEPS...
    The right foundation will even out your skin tone and give you the appearance of flawless skin. But you have to do it right, otherwise you risk looking like a ... clown. Follow these steps for a flawless complexion.
    Difficulty: Easy
    Time Required: 2 minutes


    1. Begin with clean hands and a clean face
    2.  Apply any moisturizing are you like , moisturizer or primer that's perfect for your skin type. All foundations will go on more smoothly if the skin is well-hydrated. Foundation primer is my pick, because it creates a smooth surface for foundation. (Some makeup artists believe it's a crime not to prime)
    3.  Let the moisturizer, sunscreen or primer set for a few minutes 


    4.  Wipe off any excess moisturizer with a tissue. Greasy skin will make the foundation slip and slide  
    5. Camouflouge your dark, under-eye circleswith aconcealer. Pat, never rub, the concealer into skin
    6. Using a makeup sponge or the tips of your fingers, apply dots of foundation on your cheeks, chin, forehead and tip of the nose. Makeup artists swear by foundation brushes to apply product. They soak up less foundation and blend flawlessly. 

    7.  Using the sponge, your fingertips or the foundation brush, blend the dots together. Pay special attention to your hairline and jawline to ensure there's no obvious line
    8.  Set the foundation with loose powder immediately after application.

    TIPS :
    1. You don't have to put foundation all over your face. Try spot-fixes for those areas that need coverage (likely around the eyes, nose and chin).
    2. Don't want to go all out with a foundation? Tinted moisturizers may be all you need if your complexion is dewy, but you want a light, sheer wash to even out blotchiness. My favorite tinted moisturizers are by Garnier
    3. If you use a sponge, make sure and wash out it out well so it doesn't start harboring all sorts of nasty bacteria. These foundation sponges are cheap and work perfectly.



    Monday 6 February 2012

    about make up


    Cosmetics are substances used to enhance the appearance or odor of the human body. Cosmetics include
    skin-care creams, lotions, powders, perfumes,lipsticks, fingernail and toe nail polish, eye and 
    facial makeup, towelettes, permanent waves, colored contact lenses, hair colors, hair sprays and
     gels,deodorants, hand sanitizer, baby products, bath oils, bubble baths, bath salts, butters and 
    many other types of products. A subset of cosmetics is called "make-up," which refers primarily to 
    colored products intended to alter the user’s appearance. Many manufacturers distinguish between 
    decorative cosmetics and care cosmetics. The word cosmetics derives from the Greek (kosmetikÄ“ tekhnÄ“), 
    meaning "technique of dress and ornament. Today, many well known brands namely Chanel, Make Up For 
    Ever, MAC, Revlon, Christian Dior and others. Therefore, quality makeup highlight the beauty of an 
    individual.


    §  Lipgloss, is a sheer form of lipstick that is in a liquid form.

    §  Lipsticklip glosslip linerlip plumperlip balm, lip conditioner, lip primer, and lip boosters. Lip stains have a water or gel base and may contain alcohol to help the product stay on the lips.

    §  Concealer, makeup used to cover any imperfections of the skin. Concealer is often used for any extra coverage needed to cover blemishes, or any other marks. Concealer is often thicker and more solid than foundation, and provides longer lasting, and more detailed coverage.

    §  Foundation, used to smooth out the face and cover spots or uneven skin coloration. Usually a liquid, cream, or powder, as well as most recently, a light and fluffy mousse, which provides excellent coverage as well. Foundation primer can be applied before or after to get a smoother finish. Some primers come in powder or liquid form to be applied before foundation as a base, while other primers come as a spray to be applied after you are finished to help make-up last longer.

    §  Face powder, used to set the foundation, giving a matte finish, and also to conceal small flaws or blemishes.

    §  Rouge, blush or blusher, cheek coloring used to bring out the color in the cheeks and make the cheekbones appear more defined. This comes in powder, cream, and liquid forms.

    §  Bronzer, used to give skin a bit of color by adding a golden or bronze glow.

    §  Mascara is used to darken, lengthen, and thicken the eyelashes. It is available in natural colors such as brown and black, but also comes in bolder colors such as blue, pink, or purple. There are many different formulas, including waterproof for those prone to allergies or sudden tears. Often used after an eyelash curler and mascara primer. There are now also many mascaras with certain components to help lashes to grow longer and thicker. There are specific minerals and proteins that are combined with the mascara that can benefit, as well as beautify. 

    §  Eyelid glueeyelash extensionseye linereye shadow, eye shimmer, and glitter eye pencils as well as different color pencils used to color and emphasize theeyelids (larger eyes give a more youthful appearance).
    §  Eyebrow pencils, creams, waxes, gels and powders are used to color and define the brows.
    §  Nail polish, used to color the fingernails and toenails.

    §  Setting Spray, used to keep applied makeup intact for long periods of time.